Call For Admission - 9644139972

Certify Course

IS0 9001:2008 Certifed Diploma Course .

India Best EMMC Training Institute

10 Day (8 Hour/PerDay ) Full IC Training Microscope Lap

CLick to join FACEBOOK

Daily to daily New Update in Mobile Repairing - Follow My Official Page

GET ADMISSION NOW CALL TO 9644139972

jABALPUR,MADHYA PRADESH.

How to Reset Mobile Phone Complete Guide

Hard Reset All Mobile Phone Complete Guide

Advance Mobile Repairing Free guide Solution & Software
banner
banner
banner

Saturday, 21 July 2018

How To Enable ADB Mode In FRP Locked Samsung Phone [2018]


How To Enable ADB Mode In FRP Locked Samsung Phone [2018]


Enable ADB Mode In FRP Locked Samsung Phones [2018]
If your Samsung galaxy phone like Samsung galaxy j7/ J7 Prime, Samsung Galaxy On8 SM-J710FN, J5 Prime etc devices are locked after factory reset and now you forget Google account credentials then here is a latest Samsung frp bypass trick 2018 to remove Samsung frp lock from almost all Samsung Smartphones including nougat 7.0 version.


As we all know if the adb mode or usb debugging is enabled on the device then we can easily bypass Samsung frp using Miracle box 2.27a/2.54, Z3x box and Samsung FRP Hijacker tool etc.
So now the question is that how to Enable ADB Mode In FRP Locked Samsung Phone? For this, if you have combination files of your device then it’s really very easy to enable usb debugging in frp locked Samsung devices by flashing combination file. But fact is that frp combination files are not available for all Samsung Smartphones. Same as if you try to unsupported combination file, it may brick your device permanently. So now here in this post we will help you to enable USB debugging in locked Samsung phone to remove factory reset protection.
Best part of this method is that it’s 100% working and tested by our-self and no any possibility to brick the device. Follow the procedure as it is and open Samsung android adb interface or Samsung adb mode in FRP locked phone easily.

Supporting Samsung Phones


This adb enable trick is successfully tested on Samsung Galaxy On8, Samsung Galaxy J7 Prime, Samsung Galaxy On Next, Sm-j710Fn and Samsung J610F/DS etc.

Logic Behind The Trick

Last time shared a video on “how to bypass Frp lock on Samsung Galaxy phone without pc?” But now after updating the nougat android version, there is no Google assistance option. Because of it now you can’t enter into setting in frp locked Samsung phone via Google assistance.
So this time you have enable Talk back option on your frp locked phone. After then you can open DRParser Mode by special code [(+30012012732+]. This code will help you to enable DM+ACM+ADB[USB debugging] on frp locked Samsung phone.
Once you are able to open USB debugging in locked device, Run Miracle box, Samsung FRP hijacker tool, adb frp loot or any other adb supported tool to remove frp into adb mode.
All done!!!

Enable ADB Mode In FRP Locked Samsung Phone [2018]

Now let’s start the process to enable adb mode in frp locked Samsung without pc. No need to use pc or laptop to enable adb interface or adb mode for FRP locked Samsung mobile.
For more help, you can watch video to learn how to enable USB debugging in FRP locked Samsung phone?


  • Enable WIFi in frp locked Nougat Samsung Phone. [you may use this method for all android lollipop, marshmallow or nougat Samsung phone]
  • Come back to main home screen and enable “Talk back” on the device.
[Press “Home” key three times]
  • Now “Draw L Shape” on device screen. It will show you different options, select “TalkBack Setting” option.
  • Press Volume up + Volume down key together to disable “Talk back” on the device.
  • Scroll down “TalkBack setting” section and select “Help & feedback” option again.
  • In the help section, type “VOICE” in search box >>get started with voice access.


  • Here you will see a youtube video, play it and click on search option.


  • Open google from top address bar and search “FRP bypass tool 99mediasector]
  • Select the first link to open and download “Samsung FRP bypass apk” from the list.
  • Navigate to Bookmark>>History>> Download History [Here you will see the downloaded frp bypass apk]
  • Install the “Easy FRp Bypass” apk and open it.
  • Choose “Bypass Go To Setting 01” from the options.[it will open your Phone Setting]
  • Enter into “app” >> “Google” >> Storage>> Clear Catch >> Manage storage >>Clear all data>> Go back again.
  • Notification >> click on “I” button >> enable “Feed” option.
  • Again search for “calculator” app and open calculator.
  • Type (+30012012732+to open DRParser

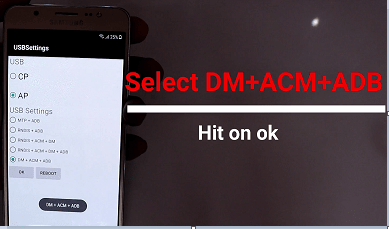
  • Now type *#0808#,it will open USB Setting on the device.


  • Select DM+ACM+ADBoption and hit on ok.


  • Again type the *#0808#, and select DM +ACM +ADB and hit on reboot options.
Phone will reboot automatically.
[USB debugging enabled on FRP locked Samsung device or Enable ADB Mode In FRP Locked Samsung Phone]


Install TWRP On Xiaomi [ Download TWRP Flasher Tool v1.1 ]


Install TWRP On Xiaomi [ Download TWRP Flasher Tool v1.1 ]


If you are a Xiaomi or Redmi android Smartphone user and want to root your own device then you device then you may know that custom twrp recovery is must to flash root files like Supersu or magisk files


We already managed different root guides for different Smartphones including Xiaomi phones. Checkout our root section to find root guide for your own Xiaomi device.
But problem is that if you are newbie user and don’t know “how to install twrp recovery by using adb command” then this post may help you to install twrp recovery on Xiaomi phone without any single command.
Just download Xiaomi TWRP Flasher Tool v1.1 [Xiaomi TWRP Tool] and install twrp recovery in one single click. Xiaomi TWRP Flasher Tool v1.1 is a small pc application which allows user to flash custom twrp recovery on Xiaomi phone toolkit.
Simple user interface and easy to manage for all noob & advance user it’s another great feature. Download Xiaomi TWRP TWRP Flasher Tool v1.1 on pc and select your own Xiaomi device mode to install twrp recovery.

Download twrp flasher tool v1.1

Xiaomi TWRP TWRP Flasher Tool Supporting Devices

  • Mi Max Prime
  • Mi Max 64GB
  • Mi Max 32GB
  • Mi Note 2
  • Mi Mix
  • Mi Note Pro
  • Mi Note
  • Redmi 4 Prime
  • Redmi 4X
  • Redmi 4A
  • Redmi 4
  • Mi5s Plus
  • Mi5s
  • Mi5 (6.0)
  • Mi5 (7.0)
  • Mi4C
  • Mi4S
  • Mi3,4
  • Remi 3,Pro
  • Redmi 3,S,X,Prime

How To Install TWRP On Xiaomi Using Xiaomi TWRP Flasher Tool v1.1

So if you are ready to flash twrp recovery using Xiaomi flasher tool v1.1 then follow the below guide as it is as shown below. It’s really very easy to flash twrp recovery on any xiaomi phone without any extra effort.
Steps To Use Xiaomi TWRP Flasher Tool V1.1
  • First off all download and install “Xiaomi usb drivers” if possible.
  • Next download Xiaomi TWRP Flasher Tool V1.1 zip file and extract it on your pc.
  • Open extracted tool folder and run “OMH Xiaomi TWRP Flasher.exe” file as administrator.


  • Tool will be launch on your pc as shown below.


  • Come to your device and attach the device with pc via USB cable.
  • Wait for a minute if drivers are installing.
  • Find your own Xiaomi phone name and type the correct number to flash twrp recovery.
  • Now device will boot into fastboot mode automatically, if not then Boot into fastboot mode manually.
Power off the device, press & hold volume down + power key togather at the same time and device will boot into fastboot mode.


  • Tool will detect the xiaomi device if it’s already into fastboot mode.
  • Here it will take few minutes to flash custom twrp recovery on Xiaomi phone.

Please Note: Don’t try to unplug usb cable in between twrp flashing process. Otherwise it may brick your device or stuck in Mi logo.
  • After flashing twrp recovery, phone will reboot automatically.
  • All done!!! You have successfully flash twrp recovery on Xiaomi phone using twrp flasher tool v1.1.


Important:
  • After flashing twrp recovery on Xiaomi phone, device may take long time in first reboot. So sit back and wait to reboot automatically.
  • If device stuck on Mi logo or bootloop, flash MiUi fastboot rom using Mi flash tool. [GUIDE]
  • TWRP recovery flashing will void phone warranty.
  • Don’t forget to take backup of your device before flashing twrp recovery.

Samsung Galaxy J7 Prime G610F Combination File [Enable ADB File]


Samsung Galaxy J7 Prime G610F Combination File [Enable ADB File]

Are you searching for Samsung Galaxy J7 Prime SM-G610F combination file? If yes then you have landed on right place. Just go to beow download section and download Samsung G610F Combination file to bypass frp lock.


What Is Samsung Combination File?
Samsung combination files are pre-enabled usb debugging firmware ROM and combination files may be different for different Samsung devices according to their build number and region. So make sure you have download compatible Samsung combination file for your device. If you are sure, you have downloaded the correct combination file for your own frp locked Samsung device then go ahead and follow the combination file flashing procedure & unlock Samsung frp without any flash tool.
If you are new and don’t know how to use Samsung combination file or adb enable file then visit on below detail guide


In short, Samsung 610F combination file or adb enable file comes with pre-installed USB debugging and oem lock. So we can flash these combination file to enable USB debugging and oem lock in FRP locked Samsung phones. After enable USB debugging in frp locked mobile, you may use any adb frp bypass tool like FRP hijacker tool, Odin tool, miracle box or z3x box etc.
Before going to download and flash Samsung SM-610F combination file, we recommend you to watch the below video to enable USB debugging in frp locked Samsung mobile. If it’s help for you then no need to flash adb files and combination file to enable adb mode.


In any case the above video is not supporting to FRP locked Samsung J7 prime G610F then download adb enable file for Samsung J7 prime SM-G610F nougat mobile.

About : Download Samsung Galaxy J7 Prime G610F Combination File
Brand : Samsung
Model : Samsung Galaxy J7 Prime SM-G610F
OS : Android Nougat
File Type : ADB File or Combination file


Pre-Requirements

  • Download and install Samsung USB drivers on windows pc.
  • Samsung official flash tool – ODIN TOOL
  • Samsung J7 Prime G610 enable adb file or combination file.

How To Samsung Galaxy J7 Prime G610F Combination File

  • Download Samsung Galaxy J7 Prime SM-G610F combination file and extract it on pc.
  • Power off frp locked Samsung J7 prime and boot into download mode or odin mode.
[Press & hold volume down + home + power key togather at the same time, once you see the warning message press volume up key again]
  • Connect the device with pc via USB cable.
  • Open Odin tool folder and run Odin.exe file as administrator.
  • Now odin will detect the device and you will see ADDED!!! Message in log window. Same as you will see blue ID:COM that means device is successfully detected by Odin tool.
  • Navigate to “Option” tab and configure it as show below.


  • Click on “Ap”Or “PDA” button and browse the combination file [.tar.md5 format file]
  • Check everything properly and then hit on “START” button to start flash combination file.
  • Here it may take few minutes to flash combination file on the device.
  • Once you see the green “PASS” message on the screen, device will reboot into factory binary mode as shown below.

  • Now USB debugging and OEM should be enable automatically.
[Enable developer option and check debugging & OEm enabled or not, if not then enable both options]
  • All Done!!! you have successfully flashed combination file on Samsung j7 prime to enable USB debugging or adb.


Monday, 16 July 2018

META MODE In Micromax devices. How to get out of Meta Mode?


META MODE In Micromax devices.

 How to get out of Meta Mode?

The reason you are here might be that you have possibly reached what is called "Meta Mode" in your Micromax device and are not able to get out of it. Chances are also high that your phone is permanently locked due to too many pattern attempts. Here you will get to know how you can get out of both of them without having to format or hard reset your phone.


Here are few things to know about the Meta Mode.

Q-1. How do we get into Meta Mode?

Ans. By pressing and holding the volume down button while switching on the device.

Q-2. How can I get out of the Meta Mode?

Ans. The easiest and seemingly most obvious way for an amateur is to remove the battery, put it back and switch on the phone. However there is more clever way which I am going to tell at the bottom of this blog.

Q-3. Is the Meta Mode useful in any way?

Ans. Meta Mode is an extremely useful thing. In fact it can be your only rescuer in a situation where:
  • Your phone is locked due to too many pattern attempts
  • Data connection is turned off
  • Wi-Fi is off
  • USB debugging in the Developer option is off


In such a situation it becomes very difficult to unlock your phone without formatting because there is no internet connection to unlock by signing in.

Now, one way that remains is to unlock your phone using ADB or Android Debug Bridge. But the primary requirement for this method to work is that the USB debugging mode should be turned on.
Here comes the major role of Meta Mode.

Just put your phone into Meta Mode (by switching on the phone while holding the volume down button) and it will act as if the USB debugging mode of the phone is turned on.

How to Backup and Restore IMEI / NVRAM Data on Android Devices


Android is capable of immense customization and flexibility and this is probably the greatest reason why it’s the most popular OS among smartphone lovers. Powering up the performance of a device through customizing and optimizing is the best part of it and custom ROMs are the solution to the desire for customization.
There are plenty of them to choose from. However, no matter which ROM we choose, it should always be kept in mind that we are dealing with an unofficial port of the Android system. That is why flashing a custom ROM can be applied through manual step by step procedure and thus it’s always advised to take a full backup of your device’s data to avoid data loss in case of something goes wrong and all of your phone’s data are gone.
Of course, you can always restore your phone by flashing the stock Android ROM and have your data back from the backup file. But sometimes you are still unable to use any network or connect to WiFi. Ever wondered why? That is because the custom ROM installation failure causes you erasing the IMEI/NVRAM data of your device and to restore them you need to back them up too. So, here is a complete guide to backup and restore your IMEI/NVRAM data.

What is an IMEI ?

IMEI stands for International Mobile Equipment Identity and it is consist of 15 decimal digits (14 digits plus a clock digit). It’s a unique identification number for GSM, UMTS, LTE devices and as well as some satellite phones.
An IMEI number helps to identify valid devices and therefore the number can be used to “blacklist” a stolen device from using that network and sometimes other networks too.

How to find my device’s IMEI number?

There are several ways to find a device’s IMEI number –
  • The universal way to find a device’s IMEI number is by dialing *#06# from the device and a pop-up will appear with it’s IMEI number.
  • Android users can check their IMEI number by going to “Settings” > “About Phone” > “Status” and will see a number under “IMEI” option .
  • Every phone on this planet comes with an IMEI number printed at the back, under the battery.

What is NVRAM ?

Non-Volatile Random Access Memory, a type of memory that retains it’s contests after switching off a device. It consists of SRAM and EEPROM chips. NVRAM contains data like WiFi and Bluetooth MAC address, Baseband version, IMEI/MEID number and other essential information.

So losing or corrupt NVRAM data means you will not be able to use your device with any mobile network or connect to WiFi.

How to take backup of IMEI/NVRAM data?

  1. Download MtkDroidTools v2.5.3.zip.
  2. Unzip the file on your PC and run MTKdroidTools.exe.
  3. Enable USB Debugging on your Android phone by going to “SettingsAbout Phone” and locate “Build Number“. Then tap on build number seven time and now you have “Developer Options” enabled on your device. Go back to “Settings” page and tap on “Developer Options“. Now tap on “USB Debugging” checkbox to enable USB debugging on your device.
  4. Connect your device to your PC via USB cable.
  5. Click on the “Root” button at the bottom of the program window and grant root permission in your phone.
  6. Now click on “IMEI/NVRAM” button. A pop-up window will appear.
  7. Click on “Backup” button and the application will backup your IMEI/NVRAM data in the “BackupNVRAM” folder inside “MTKdroidTools” folder.
How to restore my IMEI/NVRAM data ?
  1. Run MTKdroidTools.exe from PC.
  2. Enable USB Debugging on your phone and connect it to your PC via USB cable.
  3. Click o the “Root” button at the bottom of the program window and grant root permission in your phone.
  4. Then click on “Restore” button. It will ask for a .bin file and a .tar file. Select the correct file from “BackupNVRAM” folder. If everything goes well you have successfully restored your phone’s IMEI/NVRAM data.
Now install any custom ROM of your choice without worrying about loosing IMEI/NVRAM data and make most out of Android. That’s all for now. Keep reading and sharing your thoughts with us down in the comments below.

banner
banner
Copyright by Asia Telecom ,Created By Asia Telecom. Powered by Blogger.